Upgrading to v2.0.7+ — Namespace Migration
This section applies only to Rancher upgrades from v2.0.6 or earlier to v2.0.7 or later. Upgrades from v2.0.7 to later version are unaffected.
In Rancher v2.0.6 and prior, system namespaces crucial for Rancher and Kubernetes operations were not assigned to any Rancher project by default. Instead, these namespaces existed independently from all Rancher projects, but you could move these namespaces into any project without affecting cluster operations.
These namespaces include:
kube-systemkube-publiccattle-systemcattle-alerting1cattle-logging1cattle-pipeline1ingress-nginx
1 Only displays if this feature is enabled for the cluster.
However, with the release of Rancher v2.0.7, the System project was introduced. This project, which is automatically created during the upgrade, is assigned the system namespaces above to hold these crucial components for safe keeping.
During upgrades from Rancher v2.0.6- to Rancher v2.0.7+, all system namespaces are moved from their default location outside of all projects into the newly created System project. However, if you assigned any of your system namespaces to a project before upgrading, your cluster networking may encounter issues afterwards. This issue occurs because the system namespaces are not where the upgrade expects them to be during the upgrade, so it cannot move them to the System project.
- To prevent this issue from occurring before the upgrade, see Preventing Cluster Networking Issues.
- To fix this issue following upgrade, see Restoring Cluster Networking.
Note: If you are upgrading from from Rancher v2.0.13 or earlier, or v2.1.8 or earlier, and your cluster's certificates have expired, you will need to perform additional steps to rotate the certificates.
Preventing Cluster Networking Issues
You can prevent cluster networking issues from occurring during your upgrade to v2.0.7+ by unassigning system namespaces from all of your Rancher projects. Complete this task if you've assigned any of a cluster's system namespaces into a Rancher project.
Log into the Rancher UI before upgrade.
From the context menu, open the local cluster (or any of your other clusters).
From the main menu, select Project/Namespaces.
Find and select the following namespaces. Click Move and then choose None to move them out of your projects. Click Move again.
Note: Some or all of these namespaces may already be unassigned from all projects.
kube-systemkube-publiccattle-systemcattle-alerting1cattle-logging1cattle-pipeline1ingress-nginx
1 Only displays if this feature is enabled for the cluster.
Moving namespaces out of projects 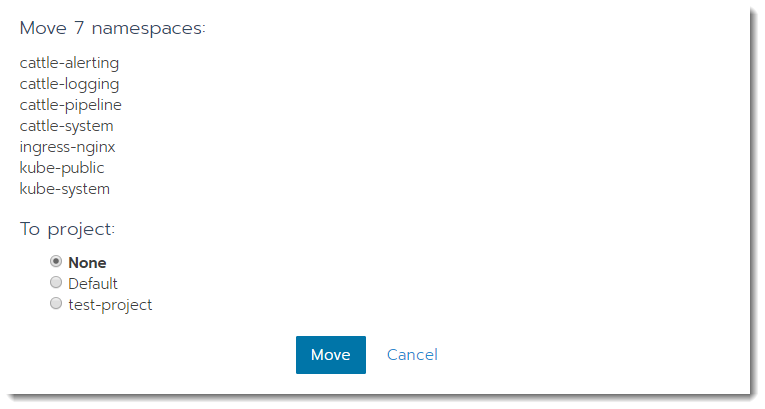Repeat these steps for each cluster where you've assigned system namespaces to projects.
Result: All system namespaces are moved out of Rancher projects. You can now safely begin the upgrade.
Restoring Cluster Networking
Reset the cluster nodes' network policies to restore connectivity.
Prerequisites:
Download and setup kubectl.
- Kubernetes Install
- Rancher Launched Kubernetes
From Terminal, change directories to your kubectl file that's generated during Rancher install,
kube_config_rancher-cluster.yml. This file is usually in the directory where you ran RKE during Rancher installation.Before repairing networking, run the following two commands to make sure that your nodes have a status of
Readyand that your cluster components areHealthy.kubectl --kubeconfig kube_config_rancher-cluster.yml get nodes
NAME STATUS ROLES AGE VERSION
165.227.114.63 Ready controlplane,etcd,worker 11m v1.10.1
165.227.116.167 Ready controlplane,etcd,worker 11m v1.10.1
165.227.127.226 Ready controlplane,etcd,worker 11m v1.10.1
kubectl --kubeconfig kube_config_rancher-cluster.yml get cs
NAME STATUS MESSAGE ERROR
scheduler Healthy ok
controller-manager Healthy ok
etcd-0 Healthy {"health": "true"}
etcd-2 Healthy {"health": "true"}
etcd-1 Healthy {"health": "true"}Check the
networkPolicyfor all clusters by running the following command.kubectl --kubeconfig kube_config_rancher-cluster.yml get cluster -o=custom-columns=ID:.metadata.name,NAME:.spec.displayName,NETWORKPOLICY:.spec.enableNetworkPolicy,APPLIEDNP:.status.appliedSpec.enableNetworkPolicy,ANNOTATION:.metadata.annotations."networking\.management\.cattle\.io/enable-network-policy"
ID NAME NETWORKPOLICY APPLIEDNP ANNOTATION
c-59ptz custom <nil> <nil> <none>
local local <nil> <nil> <none>
Disable the
networkPolicyfor all clusters, still pointing toward yourkube_config_rancher-cluster.yml.kubectl --kubeconfig kube_config_rancher-cluster.yml get cluster -o jsonpath='{range .items[*]}{@.metadata.name}{"\n"}{end}' | xargs -I {} kubectl --kubeconfig kube_config_rancher-cluster.yml patch cluster {} --type merge -p '{"spec": {"enableNetworkPolicy": false},"status": {"appliedSpec": {"enableNetworkPolicy": false }}}'Tip: If you want to keep
networkPolicyenabled for all created clusters, you can run the following command to disablenetworkPolicyforlocalcluster (i.e., your Rancher Server nodes):kubectl --kubeconfig kube_config_rancher-cluster.yml patch cluster local --type merge -p '{"spec": {"enableNetworkPolicy": false},"status": {"appliedSpec": {"enableNetworkPolicy": false }}}'Remove annotations for network policy for all clusters
kubectl --kubeconfig kube_config_rancher-cluster.yml get cluster -o jsonpath='{range .items[*]}{@.metadata.name}{"\n"}{end}' | xargs -I {} kubectl --kubeconfig kube_config_rancher-cluster.yml annotate cluster {} "networking.management.cattle.io/enable-network-policy"="false" --overwriteTip: If you want to keep
networkPolicyenabled for all created clusters, you can run the following command to disablenetworkPolicyforlocalcluster (i.e., your Rancher Server nodes):kubectl --kubeconfig kube_config_rancher-cluster.yml annotate cluster local "networking.management.cattle.io/enable-network-policy"="false" --overwriteCheck the
networkPolicyfor all clusters again to make sure the policies have a status offalse.kubectl --kubeconfig kube_config_rancher-cluster.yml get cluster -o=custom-columns=ID:.metadata.name,NAME:.spec.displayName,NETWORKPOLICY:.spec.enableNetworkPolicy,APPLIEDNP:.status.appliedSpec.enableNetworkPolicy,ANNOTATION:.metadata.annotations."networking\.management\.cattle\.io/enable-network-policy"
ID NAME NETWORKPOLICY APPLIEDNP ANNOTATION
c-59ptz custom false false false
local local false false falseRemove all network policies from all namespaces. Run this command for each cluster, using the kubeconfig generated by RKE.
for namespace in $(kubectl --kubeconfig kube_config_rancher-cluster.yml get ns -o custom-columns=NAME:.metadata.name --no-headers); do
    kubectl --kubeconfig kube_config_rancher-cluster.yml -n $namespace delete networkpolicy --all;
done
Remove all the projectnetworkpolicies created for the clusters, to make sure networkpolicies are not recreated.
for cluster in $(kubectl --kubeconfig kube_config_rancher-cluster.yml get clusters -o custom-columns=NAME:.metadata.name --no-headers); do
    for project in $(kubectl --kubeconfig kube_config_rancher-cluster.yml get project -n $cluster -o custom-columns=NAME:.metadata.name --no-headers); do
        kubectl --kubeconfig kube_config_rancher-cluster.yml delete projectnetworkpolicy -n $project --all
    done
done
Tip: If you want to keep
networkPolicyenabled for all created clusters, you can run the following command to disablenetworkPolicyforlocalcluster (i.e., your Rancher Server nodes):for project in $(kubectl --kubeconfig kube_config_rancher-cluster.yml get project -n local -o custom-columns=NAME:.metadata.name --no-headers); do
kubectl --kubeconfig kube_config_rancher-cluster.yml -n $project delete projectnetworkpolicy --all;
doneWait a few minutes and then log into the Rancher UI.
- If you can access Rancher, you're done, so you can skip the rest of the steps.
- If you still can't access Rancher, complete the steps below.
Force your pods to recreate themselves by entering the following command.
kubectl --kubeconfig kube_config_rancher-cluster.yml delete pods -n cattle-system --allLog into the Rancher UI and view your clusters. Created clusters will show errors from attempting to contact Rancher while it was unavailable. However, these errors should resolve automatically.
If you can access Rancher, but one or more of the clusters that you launched using Rancher has no networking, you can repair them by moving them:
Using the cluster's embedded kubectl shell.
By downloading the cluster kubeconfig file and running it from your workstation.
for namespace in $(kubectl --kubeconfig kube_config_rancher-cluster.yml get ns -o custom-columns=NAME:.metadata.name --no-headers); do
  kubectl --kubeconfig kube_config_rancher-cluster.yml -n $namespace delete networkpolicy --all;
done