Rancher Extensions
Extensions allow users, developers, partners, and customers to extend and enhance the Rancher UI. In addition, users can make changes and create enhancements to their UI functionality independent of Rancher releases. Extensions will enable users to build on top of Rancher to better tailor it to their respective environments. Note that users will also have the ability to update to new versions as well as roll back to a previous version.
Extensions are Helm charts that can only be installed once into a cluster; therefore, these charts have been simplified and separated from the general Helm charts listed under Apps.
Examples of built-in Rancher extensions are Fleet, Explorer, and Harvester. Examples of other extensions that use the Extensions API that can be manually added are Kubewarden and Elemental.
Prerequisites
- You must log in as an administrator to view and interact with the extensions management page.
- You must enable extension support.
Enabling Extension Support in Rancher
Rancher v2.9.0 and later includes extension support.
You can confirm if extension support is enabled by checking the uiextension feature flag. Any changes to this feature flag cause the Rancher pod to restart.
When you enable extension support for the first time, it creates resources, such as the CRDs, so that UI Extensions can work. When extension support is disabled, it disables the endpoints and does not cache any files. However, it does not remove any CRs or delete any extensions that were installed before. If re-enabled, it exposes the required endpoints again and creates CRDs as needed. The extensions that were already installed load after the Rancher pod restarts.
Caching Extension Files
By default, Rancher caches every extension file in the file system. You can change that behavior by setting plugin.noCache to true.
Rancher does have a cached file size limit of 30MB. If an extension has a file bigger than that, the cache is disabled and plugin.noCache is set to true, regardless of user input.
Installing Extensions
Click ☰ > Extensions under Configuration.
On the Extensions page, select the Available tab to choose the extensions that you want to install.
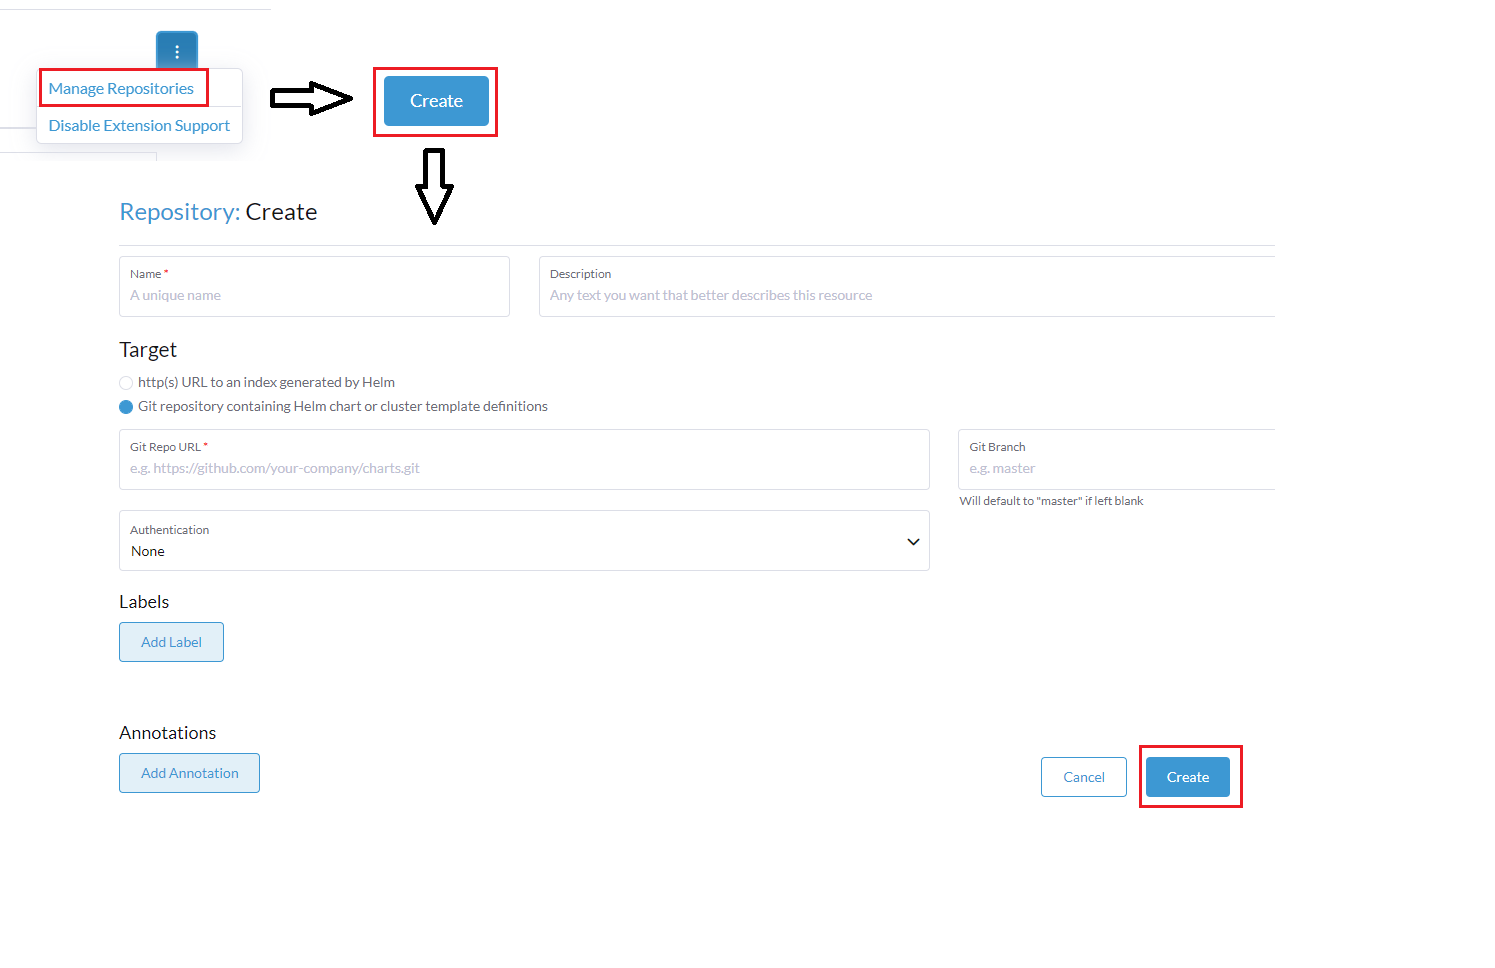
If no extensions are listed as available, you can manually add the repos:
3.1. On the upper right, click ⋮ > Manage Repositories > Create.
3.2. Add the desired repo name, making sure to also specify the Git repo URL and the Git branch.
3.3. Click Create in the lower right again to complete.
Under the Available tab, click Install on the desired extension and version, as in the example below. You can also update your extension from this screen. The button to Update appears on the extension card if an update is available.
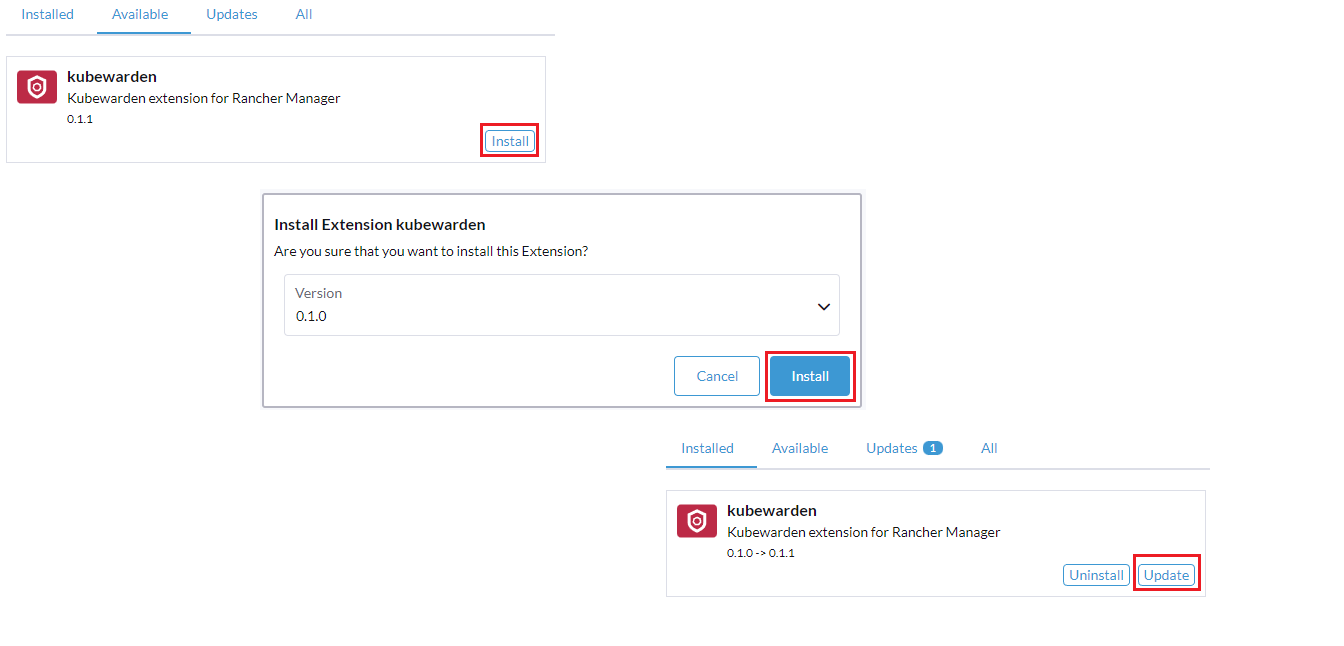
Click Reload after your extension successfully installs to check its status. Updates to the UI aren't visible until you reload the page.

Updating and Upgrading Extensions
- Click ☰ > Extensions under Configuration.
- Select the Updates tab.
- Click Update.
If there is a new version of the extension, there will also be an Update button visible on the associated card for the extension in the Available tab.
Deleting Extensions
- Click ☰, then click on the name of your local cluster.
- From the sidebar, select Apps > Installed Apps.
- Find the name of the chart you want to delete and select the checkbox next to it.
- Click Delete.
Deleting Extension Repositories
- Click ☰ > Extensions under Configuration.
- On the top right, click ⋮ > Manage Repositories.
- Find the name of the extension repository you want to delete. Select the checkbox next to the repository name, then click Delete.
Deleting Extension Repository Container Images
- Click ☰, then select Extensions, under Configuration.
- On the top right, click ⋮ > Manage Extension Catalogs.
- Find the name of the container image you want to delete, then click ⋮ > Uninstall.
Uninstalling Extensions
There are two ways to uninstall or disable an extension:
Under the Installed tab, click the Uninstall button on the extension you wish to remove.

On the extensions management page, click ⋮ > Disable Extension Support. This will disable all installed extensions.

You must reload the page after disabling extensions or display issues may occur.
Enabling Unauthenticated Access to an Extension
In Rancher v2.9.0 and later, you can allow unauthenticated access to an extension. You may want to enable unauthenticated access if the extension enables a new locale or adds custom branding. By default, all extensions require user authentication to load.
To enable unauthenticated access to an extension, set plugin.noAuth to true in the CR used by the extension.
Developing Extensions
To learn how to develop your own extensions, refer to the official Getting Started guide.
Working with Extensions in an Air-gapped Environment
If you intend to work with extensions in an air-gapped environment, you must perform some extra steps before you can complete certain tasks.
Accessing Rancher UI Extensions in an Air-Gapped Environment
Rancher provides some extensions, such as Kubewarden and Elemental, through the ui-plugin-catalog container image at https://hub.docker.com/r/rancher/ui-plugin-catalog/tags. If you're trying to install these extensions in an air-gapped environment, you must make the ui-plugin-catalog image accessible.
Mirror the
ui-plugin-catalogimage to a private registry:export REGISTRY_ENDPOINT=<my-private-registry-endpoint> # e.g. "my-private-registry.com"
docker pull rancher/ui-plugin-catalog:<tag>
docker tag rancher/ui-plugin-catalog:<tag> $REGISTRY_ENDPOINT/rancher/ui-plugin-catalog:<tag>
docker push $REGISTRY_ENDPOINT/rancher/ui-plugin-catalog:<tag>Use the mirrored image to create a Kubernetes deployment:
apiVersion: apps/v1
kind: Deployment
metadata:
  name: ui-plugin-catalog
  namespace: cattle-ui-plugin-system
  labels:
    catalog.cattle.io/ui-extensions-catalog-image: ui-plugin-catalog
spec:
  replicas: 1
  selector:
    matchLabels:
      catalog.cattle.io/ui-extensions-catalog-image: ui-plugin-catalog
  template:
    metadata:
      namespace: cattle-ui-plugin-system
      labels:
        catalog.cattle.io/ui-extensions-catalog-image: ui-plugin-catalog
    spec:
      containers:
      - name: server
        image: <my-private-registry-endpoint>/rancher/ui-plugin-catalog:<tag>
        imagePullPolicy: Always
      imagePullSecrets:
        - name: <my-registry-credentials>
Expose the deployment by creating a ClusterIP service:
apiVersion: v1
kind: Service
metadata:
  name: ui-plugin-catalog-svc
  namespace: cattle-ui-plugin-system
spec:
  ports:
    - name: catalog-svc-port
      port: 8080
      protocol: TCP
      targetPort: 8080
  selector:
    catalog.cattle.io/ui-extensions-catalog-image: ui-plugin-catalog
  type: ClusterIP
Create a ClusterRepo that targets the ClusterIP service:
apiVersion: catalog.cattle.io/v1
kind: ClusterRepo
metadata:
  name: ui-plugin-catalog-repo
spec:
  url: http://ui-plugin-catalog-svc.cattle-ui-plugin-system:8080
After you successfully set up these resources, you can install the extensions from the ui-plugin-charts manifest into your air-gapped environment.
Importing and Installing Extensions in an Air-gapped Environment
- Find the address of the container image repository that you want to import as an extension. You should import and use the latest tagged version of the image to ensure you receive the latest features and security updates.
- (Optional) If the container image is private: Create a registry secret within the
cattle-ui-plugin-systemnamespace. Enter the domain of the image address in the Registry Domain Name field.
- (Optional) If the container image is private: Create a registry secret within the
- Click ☰, then select Extensions, under Configuration.
- On the top right, click ⋮ > Manage Extension Catalogs.
- Select the Import Extension Catalog button.
- Enter the image address in the Catalog Image Reference field.
- (Optional) If the container image is private, select the secret you just created from the Pull Secrets drop-down menu.
- Click Load. The extension will now be Pending.
- Return to the Extensions page.
- Select the Available tab, and click Reload to make sure that the list of extensions is up to date.
- Find the extension you just added, and click Install.
Updating and Upgrading an Extensions Repository in an Air-gapped Environment
Extensions repositories that aren't air-gapped are automatically updated. If the repository is air-gapped, you must update it manually.
First, mirror the latest changes to your private registry by following the same steps for initially importing and installing an extension repository.
After you mirror the latest changes, follow these steps:
- Click ☰ > Local.
- From the sidebar, select Workloads > Deployments.
- From the namespaces dropdown menu, select cattle-ui-plugin-system.
- Find the cattle-ui-plugin-system namespace.
- Select the
ui-plugin-catalogdeployment. - Click ⋮ > Edit config.
- Update the Container Image field within the deployment's container with the latest image.
- Click Save.