How Resource Quotas Work in Rancher Projects
Resource quotas in Rancher include the same functionality as the native version of Kubernetes. However, in Rancher, resource quotas have been extended so that you can apply them to projects.
In a standard Kubernetes deployment, resource quotas are applied to individual namespaces. However, you cannot apply the quota to your namespaces simultaneously with a single action. Instead, the resource quota must be applied multiple times.
In the following diagram, a Kubernetes administrator is trying to enforce a resource quota without Rancher. The administrator wants to apply a resource quota that sets the same CPU and memory limit to every namespace in his cluster (Namespace 1-4) . However, in the base version of Kubernetes, each namespace requires a unique resource quota. The administrator has to create four different resource quotas that have the same specs configured (Resource Quota 1-4) and apply them individually.

Resource quotas are a little different in Rancher. In Rancher, you apply a resource quota to the project, and then the quota propagates to each namespace, whereafter Kubernetes enforces your limits using the native version of resource quotas. If you want to change the quota for a specific namespace, you can override it.
The resource quota includes two limits, which you set while creating or editing a project:
Project Limits:
This set of values configures a total limit for each specified resource shared among all namespaces in the project.
Namespace Default Limits:
This set of values configures the default quota limit available for each namespace for each specified resource. When a namespace is created in the project without overrides, this limit is automatically bound to the namespace and enforced.
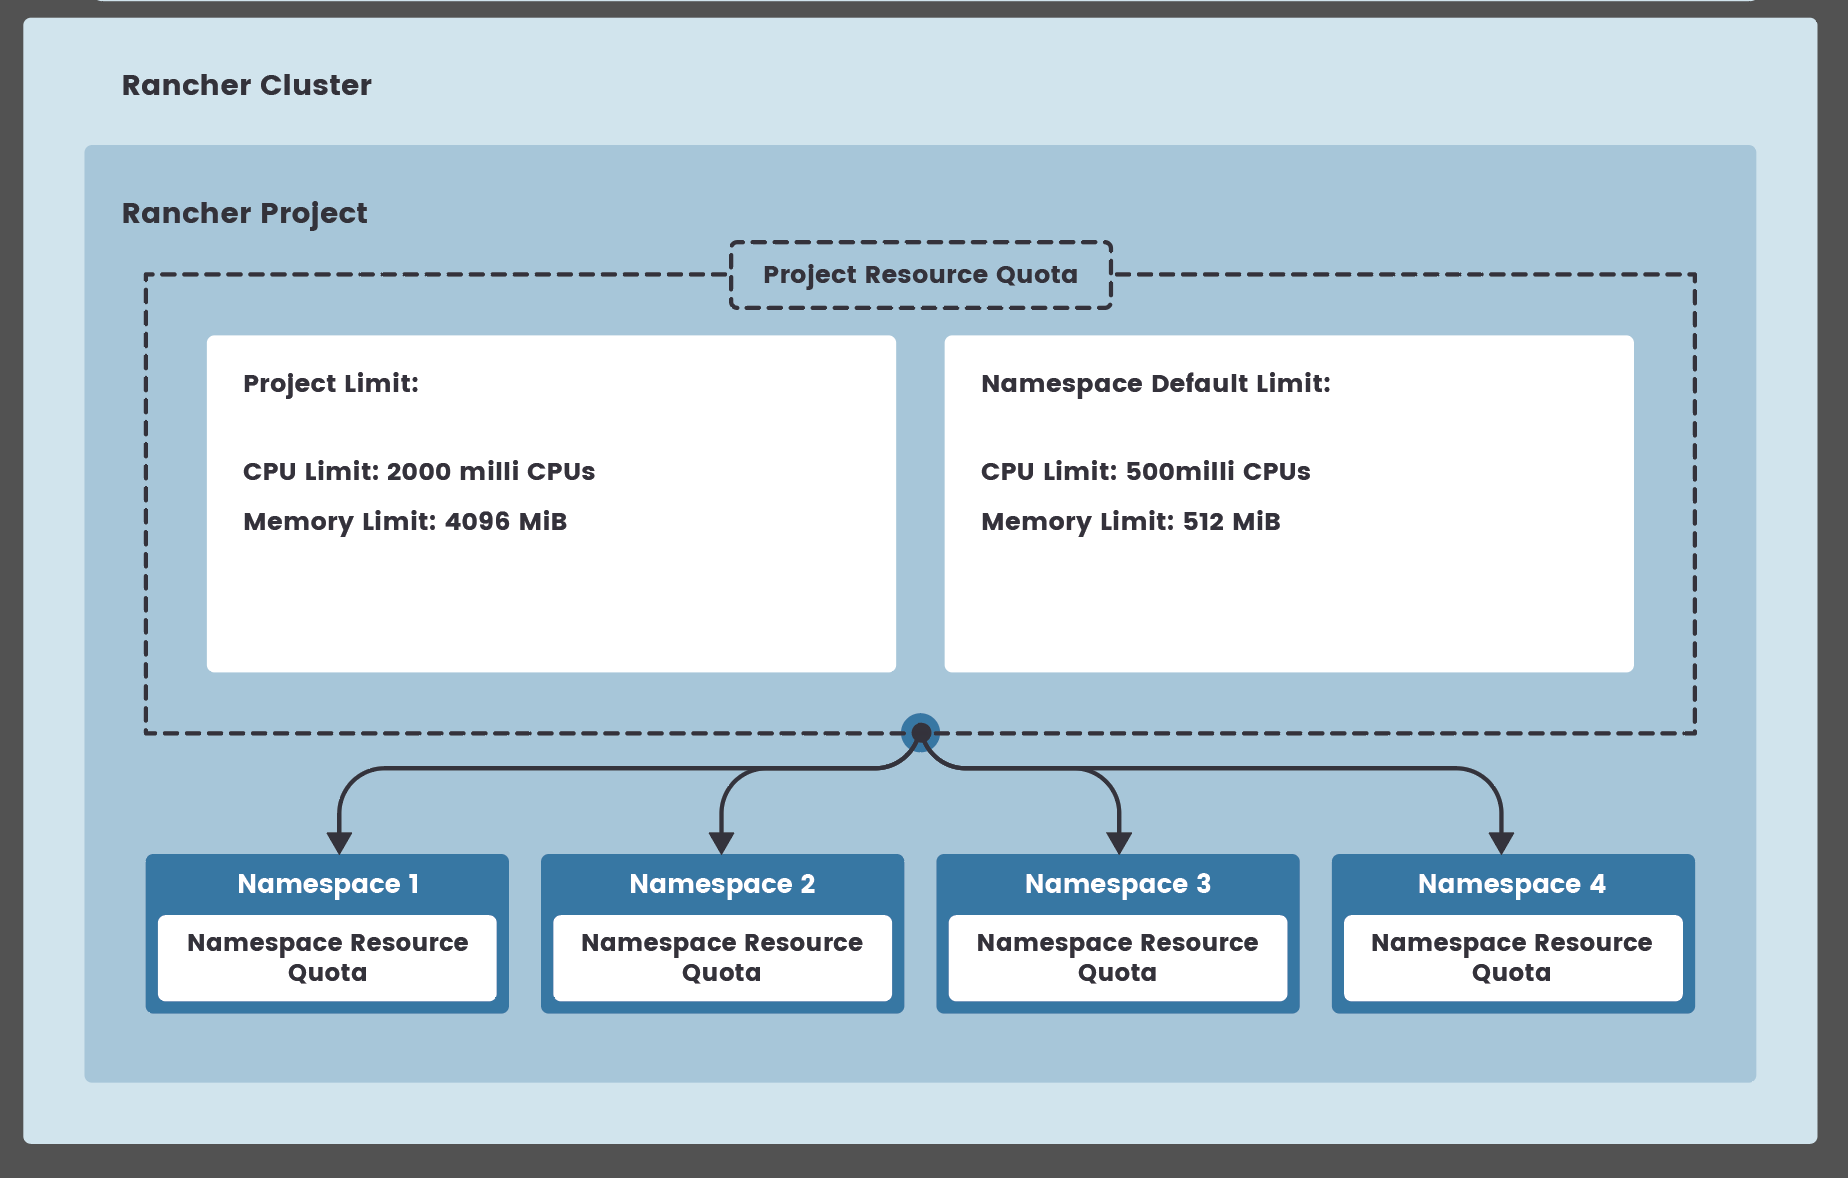
In the following diagram, a Rancher administrator wants to apply a resource quota that sets the same CPU and memory limit for every namespace in their project (Namespace 1-4). However, in Rancher, the administrator can set a resource quota for the project (Project Resource Quota) rather than individual namespaces. This quota includes resource limits for both the entire project (Project Limit) and individual namespaces (Namespace Default Limit). Rancher then propagates the Namespace Default Limit quotas to each namespace (Namespace Resource Quota) when created.
Let's highlight some more nuanced functionality for namespaces created within the Rancher UI. If a quota is deleted at the project level, it will also be removed from all namespaces contained within that project, despite any overrides that may exist. Further, updating an existing namespace default limit for a quota at the project level will not result in that value being propagated to existing namespaces in the project; the updated value will only be applied to newly created namespaces in that project. To update a namespace default limit for existing namespaces you can delete and subsequently recreate the quota at the project level with the new default value. This will result in the new default value being applied to all existing namespaces in the project.
Before creating a namespace in a project, Rancher compares the amounts of the project's available resources and requested resources, regardless of whether they come from the default or overridden limits. If the requested resources exceed the remaining capacity in the project for those resources, Rancher will assign the namespace the remaining capacity for that resource.
However, this is not the case with namespaces created outside of Rancher's UI. For namespaces created via kubectl, Rancher
will assign a resource quota that has a zero amount for any resource that requested more capacity than what remains in the project.
To create a namespace in an existing project via kubectl, use the field.cattle.io/projectId annotation. To override the default
requested quota limit, use the field.cattle.io/resourceQuota annotation.
Note that Rancher will only override limits for resources that are defined on the project quota.
apiVersion: v1
kind: Namespace
metadata:
  annotations:
    field.cattle.io/projectId: [your-cluster-ID]:[your-project-ID]
    field.cattle.io/resourceQuota: '{"limit":{"limitsCpu":"100m", "configMaps": "50"}}'
  name: my-ns
In this example, if the project's quota does not include configMaps in its list of resources, then Rancher will ignore configMaps in this override.
Users are advised to create dedicated ResourceQuota objects in namespaces to configure additional custom limits for resources not defined on the project.
Resource quotas are native Kubernetes objects, and Rancher will ignore user-defined quotas in namespaces belonging to a project with a quota,
thus giving users more control.
The following table explains the key differences between the two quota types.
| Rancher Resource Quotas | Kubernetes Resource Quotas |
|---|---|
| Applies to projects and namespace. | Applies to namespaces only. |
| Creates resource pool for all namespaces in project. | Applies static resource limits to individual namespaces. |
| Applies resource quotas to namespaces through propagation. | Applies only to the assigned namespace. |