Upgrading Rancher Installed with Docker
The following instructions will guide you through upgrading a Rancher server that was installed with Docker.
Docker installs are not supported in production environments. These instructions are provided for testing and development purposes only. Please don't use this method to install Rancher in production environments.
Prerequisites
- **Review the known upgrade issues in the Rancher documentation for the most noteworthy issues to consider when upgrading Rancher. A more complete list of known issues for each Rancher version can be found in the release notes on GitHub and on the Rancher forums. Note that upgrades to or from any chart in the rancher-alpha repository aren’t supported.
- For air gap installs only, collect and populate images for the new Rancher server version. Follow the guide to populate your private registry with the images for the Rancher version that you want to upgrade to.
Placeholder Review
During upgrade, you'll enter a series of commands, filling placeholders with data from your environment. These placeholders are denoted with angled brackets and all capital letters (<EXAMPLE>).
Here's an example of a command with a placeholder:
docker stop <RANCHER_CONTAINER_NAME>
In this command, <RANCHER_CONTAINER_NAME> is the name of your Rancher container.
Get Data for Upgrade Commands
To obtain the data to replace the placeholders, run:
docker ps
Write down or copy this information before starting the upgrade.
Terminaldocker ps Command, Displaying Where to Find <RANCHER_CONTAINER_TAG> and <RANCHER_CONTAINER_NAME>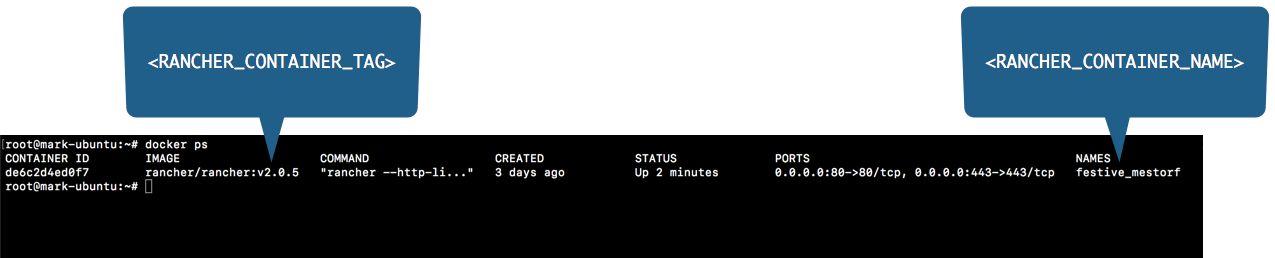
| Placeholder | Example | Description |
|---|---|---|
<RANCHER_CONTAINER_TAG> | v2.1.3 | The rancher/rancher image you pulled for initial install. |
<RANCHER_CONTAINER_NAME> | festive_mestorf | The name of your Rancher container. |
<RANCHER_VERSION> | v2.1.3 | The version of Rancher that you're creating a backup for. |
<DATE> | 2018-12-19 | The date that the data container or backup was created. |
You can obtain <RANCHER_CONTAINER_TAG> and <RANCHER_CONTAINER_NAME> by logging into your Rancher server by remote connection and entering the command to view the containers that are running: docker ps. You can also view containers that are stopped using a different command: docker ps -a. Use these commands for help anytime during while creating backups.
Upgrade Outline
During upgrade, you create a copy of the data from your current Rancher container and a backup in case something goes wrong. Then you deploy the new version of Rancher in a new container using your existing data. Follow the steps to upgrade Rancher server:
- 1. Create a copy of the data from your Rancher server container
- 2. Create a backup tarball
- 3. Pull the new Docker image
- 4. Start the new Rancher server container
- 5. Verify the Upgrade
- 6. Clean up your old Rancher server container
1. Create a copy of the data from your Rancher server container
Using a remote Terminal connection, log into the node running your Rancher server.
Stop the container currently running Rancher server. Replace
<RANCHER_CONTAINER_NAME>with the name of your Rancher container.docker stop <RANCHER_CONTAINER_NAME>- Use the command below, replacing each placeholder, to create a data container from the Rancher container that you just stopped.
docker create --volumes-from <RANCHER_CONTAINER_NAME> --name rancher-data rancher/rancher:<RANCHER_CONTAINER_TAG>
2. Create a backup tarball
- From the data container that you just created (
rancher-data), create a backup tarball (rancher-data-backup-<RANCHER_VERSION>-<DATE>.tar.gz).This tarball will serve as a rollback point if something goes wrong during upgrade. Use the following command, replacing each placeholder.
```
docker run --volumes-from rancher-data -v "$PWD:/backup" --rm busybox tar zcvf /backup/rancher-data-backup-<RANCHER_VERSION>-<DATE>.tar.gz /var/lib/rancher
```

**Step Result:** When you enter this command, a series of commands should run.
Enter the
lscommand to confirm that the backup tarball was created. It will have a name similar torancher-data-backup-<RANCHER_VERSION>-<DATE>.tar.gz.[rancher@ip-10-0-0-50 ~]$ ls
rancher-data-backup-v2.1.3-20181219.tar.gzMove your backup tarball to a safe location external from your Rancher server.
3. Pull the New Docker Image
Pull the image of the Rancher version that you want to upgrade to.
| Placeholder | Description |
|---|---|
<RANCHER_VERSION_TAG> | The release tag of the Rancher version that you want to upgrade to. |
docker pull rancher/rancher:<RANCHER_VERSION_TAG>
4. Start the New Rancher Server Container
Start a new Rancher server container using the data from the rancher-data container. Remember to pass in all the environment variables that you had used when you started the original container.
Important: Do not stop the upgrade after initiating it, even if the upgrade process seems longer than expected. Stopping the upgrade may result in database migration errors during future upgrades.
If you used a proxy, see HTTP Proxy Configuration.
If you configured a custom CA root certificate to access your services, see Custom CA root certificate.
If you are recording all transactions with the Rancher API, see API Auditing
To see the command to use when starting the new Rancher server container, choose from the following options:
- Docker Upgrade
- Docker Upgrade for Air Gap Installs
- Docker Upgrade
- Docker Air Gap Upgrade
Select which option you had installed Rancher server
Option A: Default Self-Signed Certificate
Click to expand
If you have selected to use the Rancher generated self-signed certificate, you add the --volumes-from rancher-data to the command that you had started your original Rancher server container.
| Placeholder | Description |
|---|---|
<RANCHER_VERSION_TAG> | The release tag of the Rancher version that you want to upgrade to. |
docker run -d --volumes-from rancher-data \
  --restart=unless-stopped \
  -p 80:80 -p 443:443 \
  rancher/rancher:<RANCHER_VERSION_TAG>
Option B: Bring Your Own Certificate: Self-Signed
Click to expand
If you have selected to bring your own self-signed certificate, you add the --volumes-from rancher-data to the command that you had started your original Rancher server container and need to have access to the same certificate that you had originally installed with.
Reminder of the Cert Prerequisite: The certificate files must be in PEM format. In your certificate file, include all intermediate certificates in the chain. Order your certificates with your certificate first, followed by the intermediates.
| Placeholder | Description |
|---|---|
<CERT_DIRECTORY> | The path to the directory containing your certificate files. |
<FULL_CHAIN.pem> | The path to your full certificate chain. |
<PRIVATE_KEY.pem> | The path to the private key for your certificate. |
<CA_CERTS.pem> | The path to the certificate authority's certificate. |
<RANCHER_VERSION_TAG> | The release tag of the Rancher version that you want to upgrade to. |
docker run -d --volumes-from rancher-data \
  --restart=unless-stopped \
  -p 80:80 -p 443:443 \
  -v /<CERT_DIRECTORY>/<FULL_CHAIN.pem>:/etc/rancher/ssl/cert.pem \
  -v /<CERT_DIRECTORY>/<PRIVATE_KEY.pem>:/etc/rancher/ssl/key.pem \
  -v /<CERT_DIRECTORY>/<CA_CERTS.pem>:/etc/rancher/ssl/cacerts.pem \
  rancher/rancher:<RANCHER_VERSION_TAG>
Option C: Bring Your Own Certificate: Signed by Recognized CA
Click to expand
If you have selected to use a certificate signed by a recognized CA, you add the --volumes-from rancher-data to the command that you had started your original Rancher server container and need to have access to the same certificates that you had originally installed with. Remember to include --no-cacerts as an argument to the container to disable the default CA certificate generated by Rancher.
Reminder of the Cert Prerequisite: The certificate files must be in PEM format. In your certificate file, include all intermediate certificates provided by the recognized CA. Order your certificates with your certificate first, followed by the intermediates. For an example, see Certificate Troubleshooting.
| Placeholder | Description |
|---|---|
<CERT_DIRECTORY> | The path to the directory containing your certificate files. |
<FULL_CHAIN.pem> | The path to your full certificate chain. |
<PRIVATE_KEY.pem> | The path to the private key for your certificate. |
<RANCHER_VERSION_TAG> | The release tag of the Rancher version that you want to upgrade to. |
docker run -d --volumes-from rancher-data \
  --restart=unless-stopped \
  -p 80:80 -p 443:443 \
  -v /<CERT_DIRECTORY>/<FULL_CHAIN.pem>:/etc/rancher/ssl/cert.pem \
  -v /<CERT_DIRECTORY>/<PRIVATE_KEY.pem>:/etc/rancher/ssl/key.pem \
  rancher/rancher:<RANCHER_VERSION_TAG> \
  --no-cacerts
Option D: Let's Encrypt Certificate
Click to expand
Remember: Let's Encrypt provides rate limits for requesting new certificates. Therefore, limit how often you create or destroy the container. For more information, see Let's Encrypt documentation on rate limits.
If you have selected to use Let's Encrypt certificates, you add the --volumes-from rancher-data to the command that you had started your original Rancher server container and need to provide the domain that you had used when you originally installed Rancher.
Reminder of the Cert Prerequisites:
- Create a record in your DNS that binds your Linux host IP address to the hostname that you want to use for Rancher access (
rancher.mydomain.comfor example).- Open port
TCP/80on your Linux host. The Let's Encrypt http-01 challenge can come from any source IP address, so portTCP/80must be open to all IP addresses.
| Placeholder | Description |
|---|---|
<RANCHER_VERSION_TAG> | The release tag of the Rancher version that you want to upgrade to. |
<YOUR.DNS.NAME> | The domain address that you had originally started with |
docker run -d --volumes-from rancher-data \
  --restart=unless-stopped \
  -p 80:80 -p 443:443 \
  rancher/rancher:<RANCHER_VERSION_TAG> \
  --acme-domain <YOUR.DNS.NAME>
For security purposes, SSL (Secure Sockets Layer) is required when using Rancher. SSL secures all Rancher network communication, like when you login or interact with a cluster.
For Rancher versions from v2.2.0 to v2.2.x, you will need to mirror the
system-chartsrepository to a location in your network that Rancher can reach. Then, after Rancher is installed, you will need to configure Rancher to use that repository. For details, refer to the documentation on setting up the system charts for Rancher before v2.3.0.
When starting the new Rancher server container, choose from the following options:
Option A: Default Self-Signed Certificate
Click to expand
If you have selected to use the Rancher generated self-signed certificate, you add the --volumes-from rancher-data to the command that you had started your original Rancher server container.
| Placeholder | Description |
|---|---|
<REGISTRY.YOURDOMAIN.COM:PORT> | Your private registry URL and port. |
<RANCHER_VERSION_TAG> | The release tag of the Rancher version that you want to to upgrade to. |
  docker run -d --volumes-from rancher-data \
      --restart=unless-stopped \
      -p 80:80 -p 443:443 \
      -e CATTLE_SYSTEM_DEFAULT_REGISTRY=<REGISTRY.YOURDOMAIN.COM:PORT> \ # Set a default private registry to be used in Rancher
      -e CATTLE_SYSTEM_CATALOG=bundled \ #Available as of v2.3.0, use the packaged Rancher system charts
      <REGISTRY.YOURDOMAIN.COM:PORT>/rancher/rancher:<RANCHER_VERSION_TAG>
Option B: Bring Your Own Certificate: Self-Signed
Click to expand
If you have selected to bring your own self-signed certificate, you add the --volumes-from rancher-data to the command that you had started your original Rancher server container and need to have access to the same certificate that you had originally installed with.
Reminder of the Prerequisite: The certificate files must be in PEM format. In your certificate file, include all intermediate certificates in the chain. Order your certificates with your certificate first, followed by the intermediates. For an example, see Certificate Troubleshooting.
| Placeholder | Description |
|---|---|
<CERT_DIRECTORY> | The path to the directory containing your certificate files. |
<FULL_CHAIN.pem> | The path to your full certificate chain. |
<PRIVATE_KEY.pem> | The path to the private key for your certificate. |
<CA_CERTS.pem> | The path to the certificate authority's certificate. |
<REGISTRY.YOURDOMAIN.COM:PORT> | Your private registry URL and port. |
<RANCHER_VERSION_TAG> | The release tag of the Rancher version that you want to upgrade to. |
docker run -d --restart=unless-stopped \
    -p 80:80 -p 443:443 \
    -v /<CERT_DIRECTORY>/<FULL_CHAIN.pem>:/etc/rancher/ssl/cert.pem \
    -v /<CERT_DIRECTORY>/<PRIVATE_KEY.pem>:/etc/rancher/ssl/key.pem \
    -v /<CERT_DIRECTORY>/<CA_CERTS.pem>:/etc/rancher/ssl/cacerts.pem \
    -e CATTLE_SYSTEM_DEFAULT_REGISTRY=<REGISTRY.YOURDOMAIN.COM:PORT> \ # Set a default private registry to be used in Rancher
    -e CATTLE_SYSTEM_CATALOG=bundled \ #Available as of v2.3.0, use the packaged Rancher system charts
    <REGISTRY.YOURDOMAIN.COM:PORT>/rancher/rancher:<RANCHER_VERSION_TAG>
Option C: Bring Your Own Certificate: Signed by Recognized CA
Click to expand
If you have selected to use a certificate signed by a recognized CA, you add the --volumes-from rancher-data to the command that you had started your original Rancher server container and need to have access to the same certificates that you had originally installed with.
Reminder of the Prerequisite: The certificate files must be in PEM format. In your certificate file, include all intermediate certificates provided by the recognized CA. Order your certificates with your certificate first, followed by the intermediates. For an example, see Certificate Troubleshooting.
| Placeholder | Description |
|---|---|
<CERT_DIRECTORY> | The path to the directory containing your certificate files. |
<FULL_CHAIN.pem> | The path to your full certificate chain. |
<PRIVATE_KEY.pem> | The path to the private key for your certificate. |
<REGISTRY.YOURDOMAIN.COM:PORT> | Your private registry URL and port. |
<RANCHER_VERSION_TAG> | The release tag of the Rancher version that you want to upgrade to. |
Note: Use the
--no-cacertsas argument to the container to disable the default CA certificate generated by Rancher.
docker run -d --volumes-from rancher-data \
    --restart=unless-stopped \
     -p 80:80 -p 443:443 \
     --no-cacerts \
     -v /<CERT_DIRECTORY>/<FULL_CHAIN.pem>:/etc/rancher/ssl/cert.pem \
     -v /<CERT_DIRECTORY>/<PRIVATE_KEY.pem>:/etc/rancher/ssl/key.pem \
     -e CATTLE_SYSTEM_DEFAULT_REGISTRY=<REGISTRY.YOURDOMAIN.COM:PORT> \ # Set a default private registry to be used in Rancher
     -e CATTLE_SYSTEM_CATALOG=bundled \ #Available as of v2.3.0, use the packaged Rancher system charts
     <REGISTRY.YOURDOMAIN.COM:PORT>/rancher/rancher:<RANCHER_VERSION_TAG>
Result: You have upgraded Rancher. Data from your upgraded server is now saved to the rancher-data container for use in future upgrades.
5. Verify the Upgrade
Log into Rancher. Confirm that the upgrade succeeded by checking the version displayed in the bottom-left corner of the browser window.
Having network issues in your user clusters following upgrade?
6. Clean up Your Old Rancher Server Container
Remove the previous Rancher server container. If you only stop the previous Rancher server container (and don't remove it), the container may restart after the next server reboot.
Rolling Back
If your upgrade does not complete successfully, you can roll back Rancher server and its data back to its last healthy state. For more information, see Docker Rollback.