Configure Keycloak (SAML)
If your organization uses Keycloak Identity Provider (IdP) for user authentication, you can configure Rancher to allow your users to log in using their IdP credentials.
Prerequisites
You must have a Keycloak IdP Server configured.
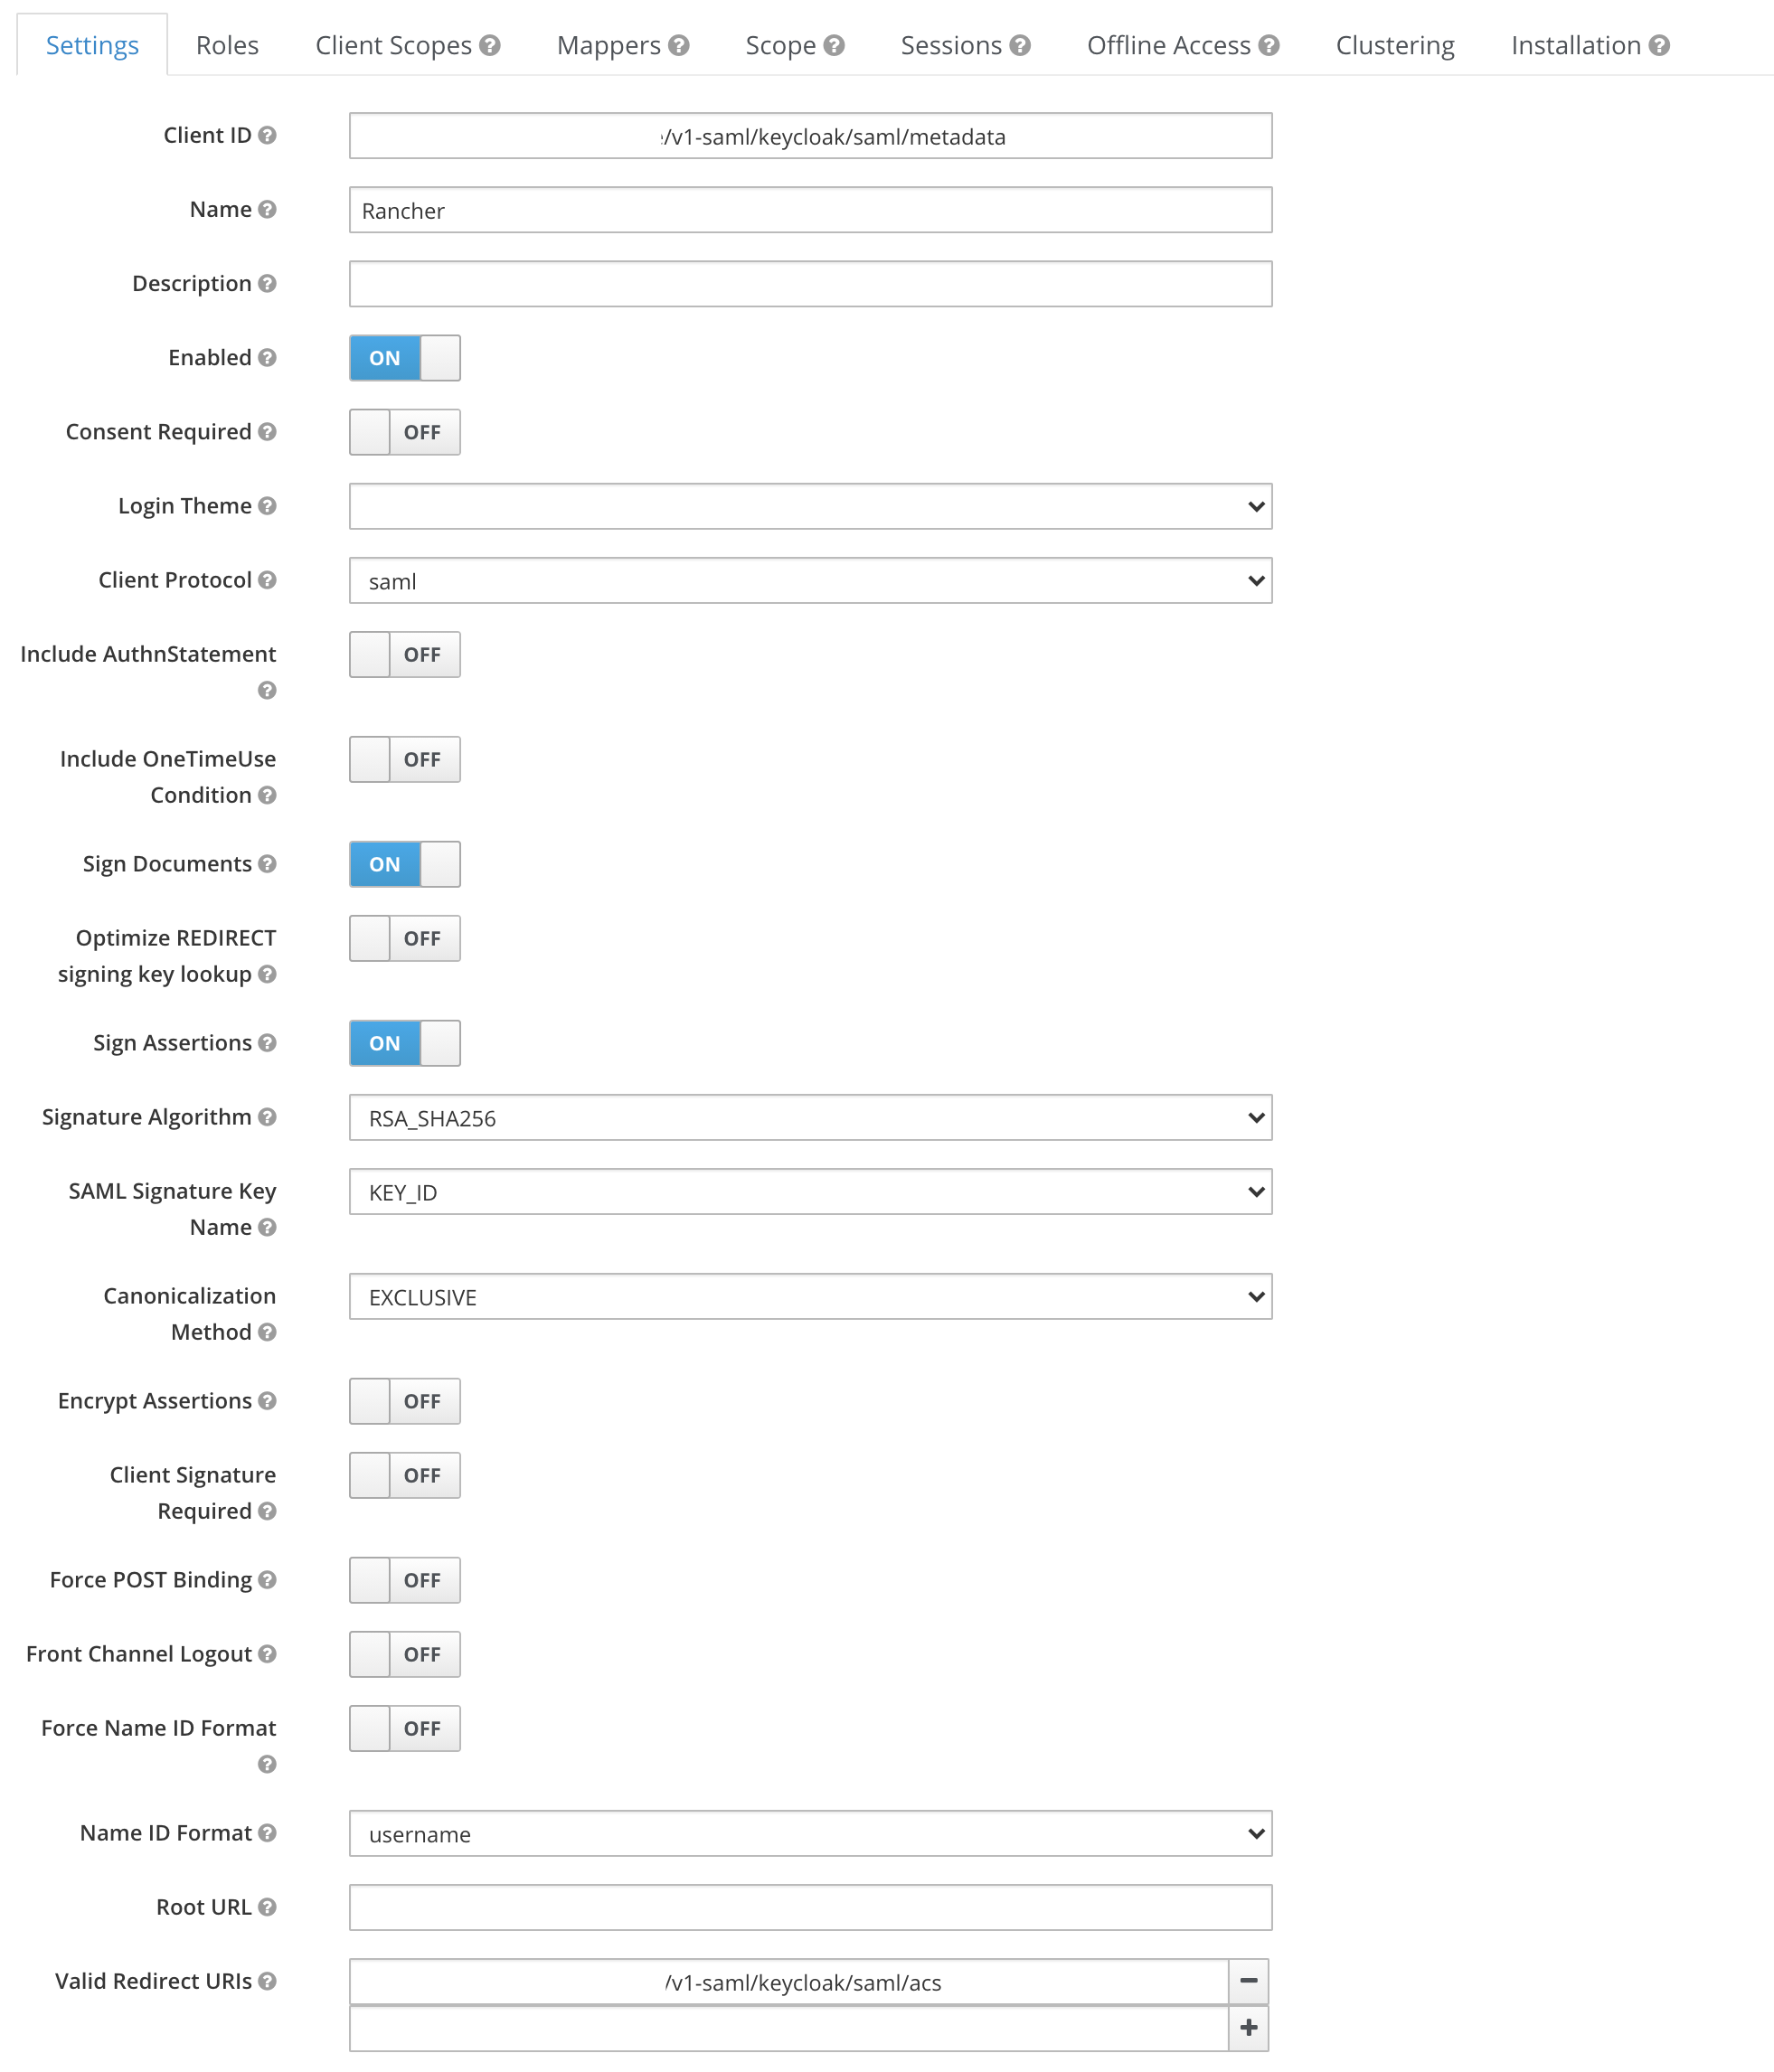
In Keycloak, create a new SAML client, with the settings below. See the Keycloak documentation for help.
Setting Value Sign DocumentsON1Sign AssertionsON1All other ON/OFFSettingsOFFClient IDEither https://yourRancherHostURL/v1-saml/keycloak/saml/metadataor the value configured in theEntry ID Fieldof the Rancher Keycloak configuration2Client Name<CLIENT_NAME> (e.g. rancher)Client ProtocolSAMLValid Redirect URIhttps://yourRancherHostURL/v1-saml/keycloak/saml/acs1: Optionally, you can enable either one or both of these settings.2: Rancher SAML metadata won't be generated until a SAML provider is configured and saved.

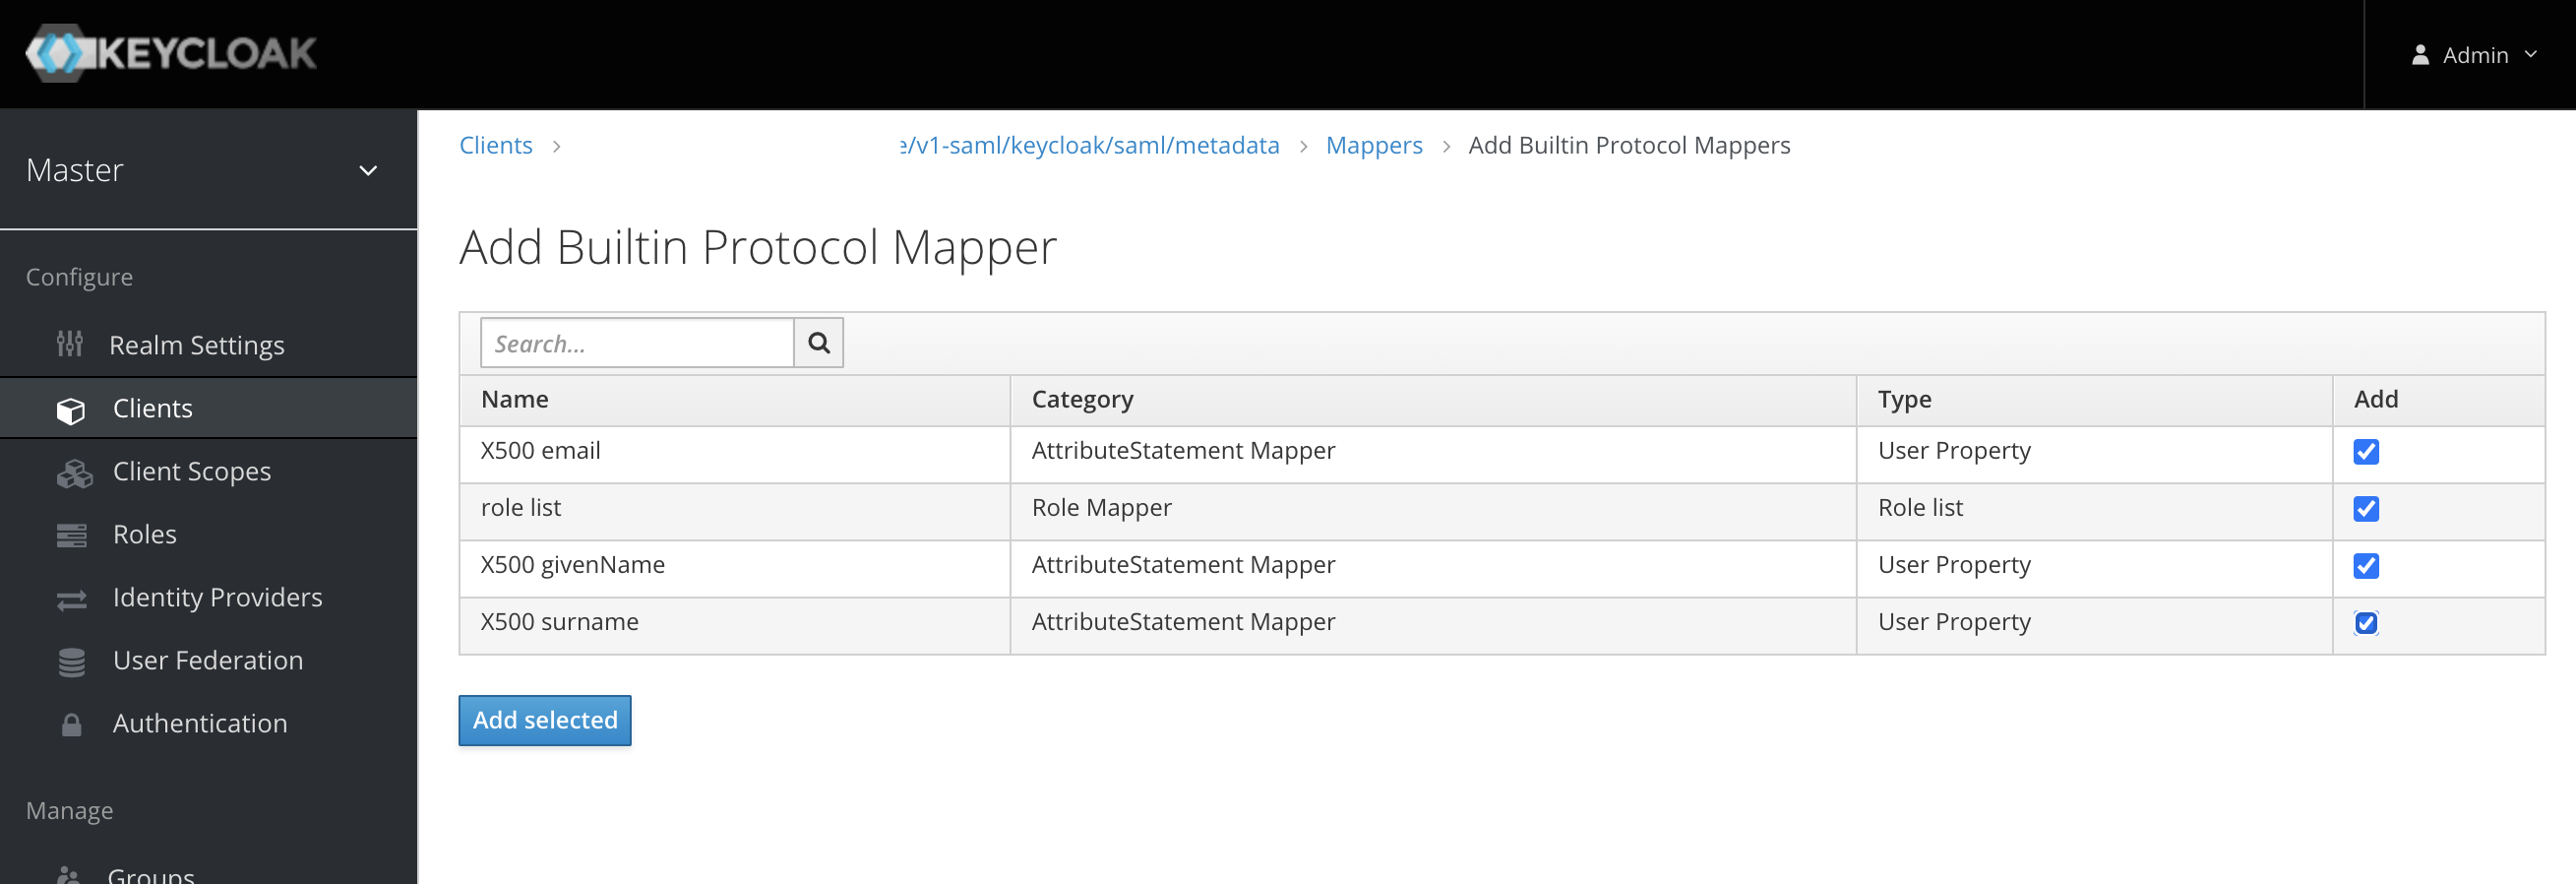
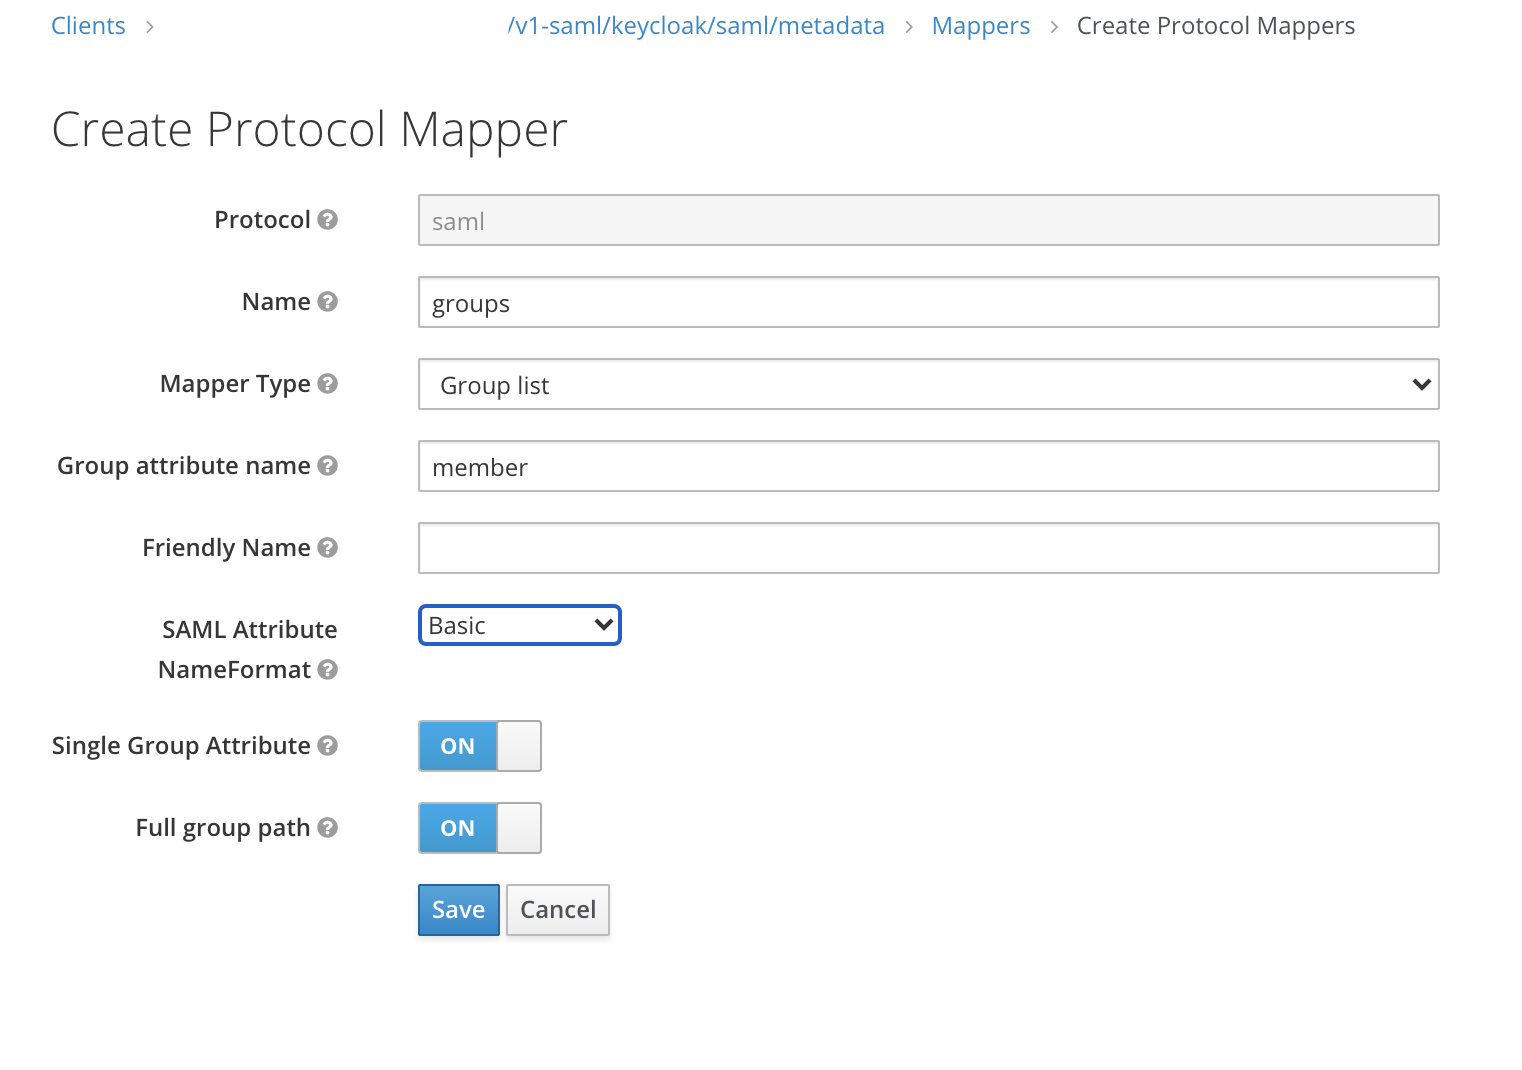
In the new SAML client, create Mappers to expose the users fields
- Add all "Builtin Protocol Mappers"

- Create a new "Group list" mapper to map the member attribute to a user's groups

- Add all "Builtin Protocol Mappers"
Getting the IDP Metadata
- Keycloak 5 and earlier
- Keycloak 6-13
- Keycloak 14+
To get the IDP metadata, export a metadata.xml file from your Keycloak client.
From the Installation tab, choose the SAML Metadata IDPSSODescriptor format option and download your file.
- From the Configure section, click the Realm Settings tab.
- Click the General tab.
- From the Endpoints field, click SAML 2.0 Identity Provider Metadata.
Verify the IDP metadata contains the following attributes:
xmlns:md="urn:oasis:names:tc:SAML:2.0:metadata"
xmlns:saml="urn:oasis:names:tc:SAML:2.0:assertion"
xmlns:ds="http://www.w3.org/2000/09/xmldsig#"
Some browsers, such as Firefox, may render/process the document such that the contents appear to have been modified, and some attributes appear to be missing. In this situation, use the raw response data that can be found using your browser.
The following is an example process for Firefox, but will vary slightly for other browsers:
- Press F12 to access the developer console.
- Click the Network tab.
- From the table, click the row containing
descriptor. - From the details pane, click the Response tab.
- Copy the raw response data.
The XML obtained contains EntitiesDescriptor as the root element. Rancher expects the root element to be EntityDescriptor rather than EntitiesDescriptor. So before passing this XML to Rancher, follow these steps to adjust it:
- Copy all the attributes from
EntitiesDescriptorto theEntityDescriptorthat are not present. - Remove the
<EntitiesDescriptor>tag from the beginning. - Remove the
</EntitiesDescriptor>from the end of the xml.
You are left with something similar as the example below:
<EntityDescriptor xmlns="urn:oasis:names:tc:SAML:2.0:metadata" xmlns:dsig="http://www.w3.org/2000/09/xmldsig#" entityID="https://{KEYCLOAK-URL}/auth/realms/{REALM-NAME}">
....
</EntityDescriptor>
- From the Configure section, click the Realm Settings tab.
- Click the General tab.
- From the Endpoints field, click SAML 2.0 Identity Provider Metadata.
Verify the IDP metadata contains the following attributes:
xmlns:md="urn:oasis:names:tc:SAML:2.0:metadata"
xmlns:saml="urn:oasis:names:tc:SAML:2.0:assertion"
xmlns:ds="http://www.w3.org/2000/09/xmldsig#"
Some browsers, such as Firefox, may render/process the document such that the contents appear to have been modified, and some attributes appear to be missing. In this situation, use the raw response data that can be found using your browser.
The following is an example process for Firefox, but will vary slightly for other browsers:
- Press F12 to access the developer console.
- Click the Network tab.
- From the table, click the row containing
descriptor. - From the details pane, click the Response tab.
- Copy the raw response data.
Configuring Keycloak in Rancher
In the top left corner, click ☰ > Users & Authentication.
In the left navigation menu, click Auth Provider.
Click Keycloak SAML.
Complete the Configure Keycloak Account form. For help with filling the form, see the configuration reference.
After you complete the Configure a Keycloak Account form, click Enable.
Rancher redirects you to the IdP login page. Enter credentials that authenticate with Keycloak IdP to validate your Rancher Keycloak configuration.
noteYou may have to disable your popup blocker to see the IdP login page.
Result: Rancher is configured to work with Keycloak. Your users can now sign into Rancher using their Keycloak logins.
- SAML Protocol does not support search or lookup for users or groups. Therefore, there is no validation on users or groups when adding them to Rancher.
- When adding users, the exact user IDs (i.e.
UID Field) must be entered correctly. As you type the user ID, there will be no search for other user IDs that may match. - When adding groups, you must select the group from the drop-down that is next to the text box. Rancher assumes that any input from the text box is a user.
- The group drop-down shows only the groups that you are a member of. You will not be able to add groups that you are not a member of.
Configuration Reference
| Field | Description |
|---|---|
| Display Name Field | The attribute that contains the display name of users. Example: givenName |
| User Name Field | The attribute that contains the user name/given name. Example: email |
| UID Field | An attribute that is unique to every user. Example: email |
| Groups Field | Make entries for managing group memberships. Example: member |
| Entity ID Field | The ID that needs to be configured as a client ID in the Keycloak client. Default: https://yourRancherHostURL/v1-saml/keycloak/saml/metadata |
| Rancher API Host | The URL for your Rancher Server. |
| Private Key / Certificate | A key/certificate pair to create a secure shell between Rancher and your IdP. |
| IDP-metadata | The metadata.xml file that you exported from your IdP server. |
You can generate a key/certificate pair using an openssl command. For example:
openssl req -x509 -sha256 -nodes -days 365 -newkey rsa:2048 -keyout myservice.key -out myservice.cert
Annex: Troubleshooting
If you are experiencing issues while testing the connection to the Keycloak server, first double-check the configuration option of your SAML client. You may also inspect the Rancher logs to help pinpointing the problem cause. Debug logs may contain more detailed information about the error. Please refer to How can I enable debug logging in this documentation.
You are not redirected to Keycloak
When you click on Authenticate with Keycloak, you are not redirected to your IdP.
- Verify your Keycloak client configuration.
- Make sure
Force Post Bindingis set toOFF.
Forbidden message displayed after IdP login
You are correctly redirected to your IdP login page and you are able to enter your credentials, however you get a Forbidden message afterwards.
- Check the Rancher debug log.
- If the log displays
ERROR: either the Response or Assertion must be signed, make sure eitherSign DocumentsorSign assertionsis set toONin your Keycloak client.
HTTP 502 when trying to access /v1-saml/keycloak/saml/metadata
This is usually due to the metadata not being created until a SAML provider is configured. Try configuring and saving keycloak as your SAML provider and then accessing the metadata.
Keycloak Error: "We're sorry, failed to process response"
- Check your Keycloak log.
- If the log displays
failed: org.keycloak.common.VerificationException: Client does not have a public key, setEncrypt AssertionstoOFFin your Keycloak client.
Keycloak Error: "We're sorry, invalid requester"
- Check your Keycloak log.
- If the log displays
request validation failed: org.keycloak.common.VerificationException: SigAlg was null, setClient Signature RequiredtoOFFin your Keycloak client.
Configuring SAML Single Logout (SLO)
Rancher supports the ability to configure SAML SLO. Options include logging out of the Rancher application only, logging out of Rancher and registered applications tied to the external authentication provider, or a prompt asking the user to choose between the previous options. The steps below outline configuration from the application GUI:
The Log Out behavior configuration section only appears if the SAML authentication provider allows for SAML SLO.
Sign in to Rancher using a standard user or an administrator role to configure SAML SLO.
In the top left corner, click ☰ > Users & Authentication.
In the left navigation menu, click Auth Provider.
Under the section Log Out behavior, choose the appropriate SLO setting as described below:
Setting Description Log out of Rancher and not authentication provider Choosing this option will only logout the Rancher application and not external authentication providers. Log out of Rancher and authentication provider (includes all other applications registered with authentication provider) Choosing this option will logout Rancher and all external authentication providers along with any registered applications linked to the provider. Allow the user to choose one of the above in an additional log out step Choosing this option presents users with a choice of logout method as described above.